Sunday, January 30, 2011

New Thunder Power RC 820CD Charger

Hello everyone,

I recently received one of the new 820CD charger/dischargers from the folks at TP. This is their entry into the high power charger market. Spec’s on the charger can be easily found on the net, but for F3A purposes you will be able to charge a typical 10s 5000 mAh F3A pack at approximately 4C (20A). This will provide recharge times as quickly as 15-18 minutes. Assuming of course you are able to feed it with 28V and 800W of power!

What I am going to show you in this report is how to wire up harnesses to be able to charge two (2) 10s 5000mAh Prolite V2 brick packs that have the 4mm interconnect bullets. Also how to wire two (2) Iota DLS-55 power supplies in order to give you the 28V and power required to charge these two packs in 30 minutes.

IMG_1400.nqliUsS2qh4N.jpg

Out of the box you are presented with a very nice looking package. Slightly larger than the previous 1010C charger. You will see a larger nicely backlit LCD screen with two line display, sealed raised face buttons that are easy to push yet give a positive feel. Two fans (one for each port) force heated air out the rear of the charger. Connections for the balance boards are on each side of the charger as is the mini-USB update port. You will also notice two charge ports!


IMG_1405.LYodZVI4v65B.jpg

The first order of business is to get the power supplies ready for action. I have Dean’s connectors on my DLS-55’s, so it was very easy for me to wire them in series with a simple series adapter as shown in the picture. If you are not familiar with how to wire DC in series there are lots of pages on the internet to help.

IMG_1407.UmVm2XSmvm32.jpg

When done this was how mine looked. Now the Iota power supplies have a small telephone jack to boost the voltage from a float voltage to a fast charge voltage (approximately 13.6V to 14.2V). With both of these jacks plugged in you will get a too high input voltage warning on the 820CD. Remove one and leave one in, this gives you as close to 28V as possible. If you remove both your peak current will be automatically reduced slightly by the charger to compensate for the lower input voltage.

IMG_1401.i0Pm5O3X2Uv1.jpg

Now lets get to work on the charger. Here is the charger with the balance boards connected. There are connections on the balance board for all TP connectors as well as 2s to 8s connectors for other popular brands.

IMG_1403.U9I97ZsuIS3B.jpg

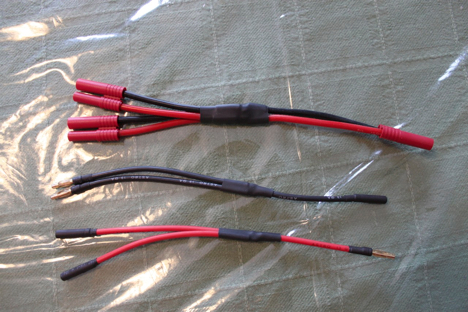
In the box comes 4 leads for making your own charge cables. The leads already have the 4mm bullets soldered to them for connecting to the charger. In order to make the leads such that you can charge a 10s brick pack with interconnects you need to solder a 4mm socket onto one of the positive leads, a 4mm male to the negative lead, and your favoured connector to the remaining two leads as shown in the picture. This process is also described in the manual.
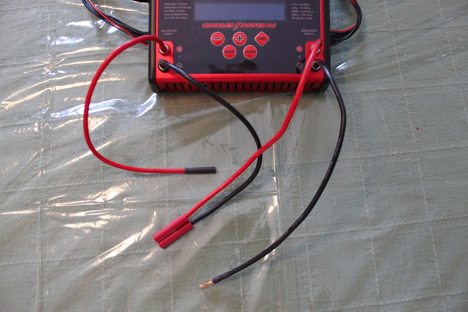
IMG_1404.T1YkprPsrEE1.jpg

The above leads need to be connected to the charger as shown here for the correct polarity. Essentially you will be charging each 5s portion of the pack on each of the two charger ports.
IMG_1410.qE7WGorfnaQ5.jpg

In order to charge two 10s 5000 mAh brick packs you will need to build some parallel adapters. This guide assumes you understand the principles for making parallel connections. It is pretty straightforward as you are simply branching a single to a double keeping the polarity constant. You need branches for both interconnects as well as the main leads.

IMG_1412.EJQtP3FECJTx.jpg

You also need to build parallel adapters for the balance leads. I took 4 balance extensions and built these two parallel adapters. Same principles apply, you are simply branching a single wire to a double keeping the polarity the same. One note of caution on the balance leads. My leads were not all color coded the same, so it is important to ensure that you are wiring them truly in parallel and not simply by color, as in my case that would have resulted in a direct short across the leads.

IMG_1413.mFi95cl4aSm7.jpg

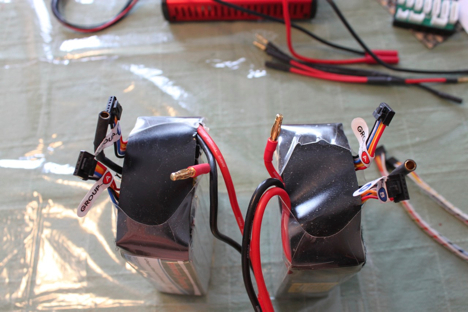
Now we have all our leads built, we can start connecting the packs. These are the two packs I will be using, very standard packs used in F3A. These batteries were both fully discharged, one was 37.3V and the other was 37.7V. These voltages will equalize when parallel connected. A small mismatch is not a problem, but I would be cautious if your packs are more than 5% different (37.5 to 38.5V). Typically in F3A our flights are so consistent that this is not normally a problem.

IMG_1414.l1Rcd9LKwpLr.jpg

Leaving the packs with the interconnects attached, the first thing I do is plug in the main lead parallel adapter. This will immediately equalize the voltage between the two. When I did this the voltage was about 37.5V.
IMG_1416.7UTFdeZ9Q8D8.jpg

Next break apart your interconnect leads.

IMG_1418.9uvOwFIpc8Iz.jpg

Now connect up both your positive interconnect parallel cable and your negative interconnect parallel cable as shown.

IMG_1419.GOPwjEndMKlO.jpg

You can now connect your parallel adapter cables to the charger cables we made up and installed earlier. As always double and triple check all your polarities the first time to ensure that you have made all the solder connections correct. Before you start connecting batteries, go ahead and power up your charger.

IMG_1420.aOhN0R7u74Ps.jpg

Now go ahead and connect up Group A of your balance connectors to the parallel balance adapter we made, and then to the Port 1 balancer board. It is important that Group A be connected to Port 1, because the primary negative lead from the batteries are connected to Port 1. Go ahead and do the same for Group B and Port 2.

IMG_1428.9SYGDNNgAJMS.jpg

Once Group B is connected, we are ready to charge. Your final setup should look something like the picture above.

IMG_1408.kqRT3tzZ5YO3.jpg

Perform the setup on both ports (port 1 shown in the picture) to charge a 5S lipo at the maximum current possible, in my case 19A was all I could set. Set the capacity (CP) to the maximum as well so that you wont shut down on capacity limit. Ensure the balance circuit is turned ON for safety reasons.

IMG_1422.HiV9t1JXPsB8.jpg

Double check all your cell voltages before the start of the charge just to be certain everything is A-OK. With the high rates of the charger things happen very quickly!

IMG_1424.PiMAzM1nPCcd.jpg

Once you are comfortable that everything is set correctly, hold down the enter key to start the charge, and repeat for the second port. The charger ramps up very fast, you can see here only 18 seconds into the charge we are already at peak current. The voltage displayed is the current battery voltage for the selected port.

IMG_1426.SrtM7F0Ech1t.jpg

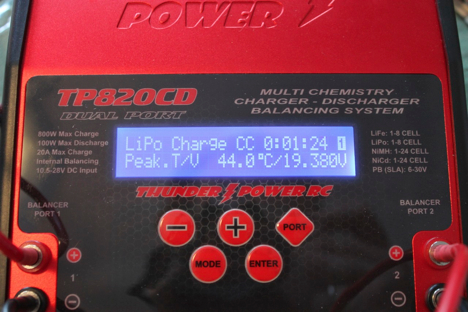
There are two other screens available by pressing the +/- keys. One is the cell voltage shown here.
IMG_1427.tyOiKVeqhTV1.jpg

The other shows the chargers max temperature. During my charge the charger reached a peak of about 60 degrees C. The fans were at full speed for most of the charge duration.

IMG_1429.IGEwZb1UYEjz.jpg

5 minutes into the charge 1600 mAh has gone to the packs (800 each). I am expecting over 7000 mAh total.

IMG_1431.UZRcLaPByD5c.jpg

At 10 minutes in a little over 3000 mAh has went to the packs.

IMG_1433.mWhERSRkwzfg.jpg

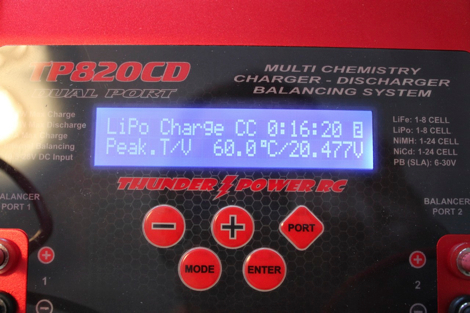
15 minutes in over 4600 mAh, this is easily over halfway from a capacity standpoint. WOW!
IMG_1434.Ly7TIOs6Anzn.jpg

We have also reached our peak internal temperature of 60C.
IMG_1436.JbXyeXdI046O.jpg

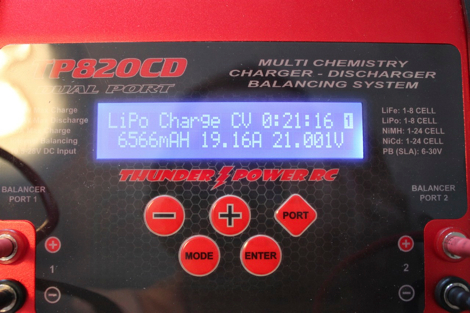
21 minutes into the charge we have put 6566 mAh into the packs, and reached peak voltage of 21V so the charger has moved to CV (constant voltage) mode.

IMG_1437.sXMHYLi5tWXs.jpg

25 minutes in the charger has ramped down to 5.5A, sent 7255 mAh into the packs and is nearing the end of the charge cycle. Remember this is for TWO (2) 10s 5000 mAh batteries!

IMG_1439.l21YK2X419n7.jpg

At just under 33 minutes the charger is finished, sending 7685 mAh (~3840 mAh each) into the packs. If you had only a single pack connected to this charge you would have completed in about 16-18 minutes. I have also done this since getting the charger (4C) charge, and it will come in very handy for those times you really need another flight!

So far I have found the 820CD very simple to use. If you are familiar with the operation of the 1010C charger then you will notice many similarities between the two with respect to operation. The construction is very good, and superior to the 1010C in almost every regard.

I have not yet tried this connected to my Honda 1000i generator. However, a 10S pack being charged at 19A is 798W peak, I expect that the Honda will have a hard time handling that amount of power. The charge current may have to be reduced slightly to allow charging from a 1000W generator. This should be more than do-able for a 2000W generator though.

To download as a PDF file click below,

http://www.mediafire.com/?gkqriqabxezxq3v

I hope you enjoyed the walk-through, if you have any questions drop me an email!

chad@f3acanada.org

Chad

Tuesday, December 28, 2010

Covering the Xigris C2

I thought I would post a small how to on covering while I am working on my ZN Line Xigris C2. I will share how I make my covering schemes, which are usually somewhat complicated. It is a fairly straight forward process and nothing to be afraid of trying.

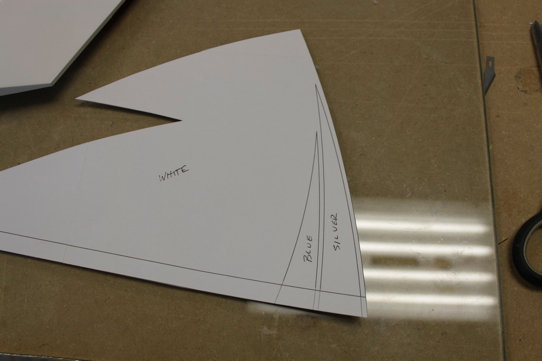
First thing is the template. I take some time and accurately draw my color scheme fullsize. I use AutoCAD but any program that allows you do draw to scale will work fine. With AutoCAD you can plot to a DWF file, and then open with another bit of free software called Autodesk Design Review. In Design Review you can then print your drawing as tiled images so you can get full size images on 8.5”x11” paper.

IMG_0424.Wn4hOIURDT3O.jpg

Next I use a spray contact adhesive to stick the plan to heavy paper for the templates.

IMG_0425.PeMAwmDcb6RD.jpg

Now we have to let this dry a little bit so the paper doesn’t peel off the heavy paper. Don’t forget to label your colors so you get the scheme right!

While that is drying we can do some preparation that needs to be done before we do the major covering job. For all my covering I use the tools in the picture, two covering irons one with a sock and one without. The one with the sock is set to about 125 degrees C, and the other is set as hot as I can get it. A small trim tool for tight places, a heat gun which I didn’t use at all for this job. Various cutting tools, rulers, weights etc.

IMG_0427.KqZ8bGOeiBQO.jpg

I always do my covering after hinging, so I do my gap sealing and some other trim details before I do the major pieces.

To do the gap sealing you first take a piece of white and crease it in half down the length. Make sure you have plenty of extra to cover the entire gap.

IMG_0430.l2cRljjynliE.jpg

Then push that piece into the gap, and use the trim seal tool to iron it neatly in place.

IMG_0434.IIOmoxQxQ58d.jpg

Then using a sharp blade, trim the excess to be flush with the surface of the part. As a note, I gap seal both top and bottom so my hinge lines are completely weather proof.

IMG_0438.IWuPywMZAhb5.jpg

Next apply the trim to the inner face of the elevator.

IMG_0439.EQL4YZnWvwGp.jpg

Thats all the trim work that I need to do on the stab. I don’t bother too much with the very root, as its all covered up once mounted onto the fuselage.

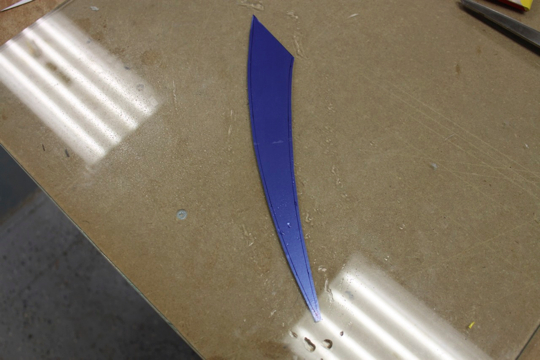
By now the templates should be dry. So you can cut out the individual pieces. Notice that I did not cut out the small silver and blue sweeps on the bottom right. This is because this area is going to be all white, so I will first cut the white covering out with the template, then cut the sweeps from the white portion after.

IMG_0440.81BaIiyybbsV.jpg

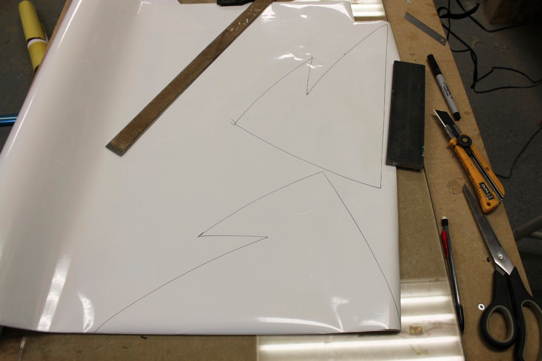
Now trace the white profile onto the covering. Do both sides at once to save time.

IMG_0441.fIscVm9PJ6qF.jpg

Now I freehand cut with scissors the white parts out. Since they will be the first color on you must leave an allowance for the next colors to overlap. About 2mm or 1/8” is fine.

IMG_0442.Iif4gfWUHnz7.jpg

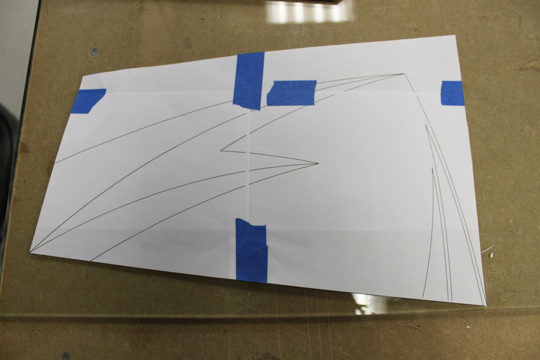
Now in order to properly locate the colors I make a second set of template trimmed to match the stab size.

IMG_0445.F5cPXbYqVv8O.jpg

I overlay that on the part, and make small pin holes to give me reference points to place the covering.

IMG_0446.LmCqX5ylaRCw.jpg

I then locate the white and yellow (yellow is cut the same way as white), as they are the two bottom colors of the scheme.

IMG_0449.IHSjCh9JcwXO.jpg

I use some masking tape around the tip to protect the bottom colors from having adhesive stuck to them. After you trim the tip colors off then you just pull this off. I find that sometimes, especially red and blue leave a lot of adhesive when they get trimmed away if you accidentally heated past where you will trim.

IMG_0450.ZCTCATSLLvI0.jpg

Then its time to cut the red. Since the red overlaps it needs an exact cut. Its best to use a piece of glass and a sharp blade to trace along the template. Its important that this cut is clean as you will see it on the finished product.

IMG_0443.04UTCu4a410K.jpg

Now apply the red using some guides to help with the alignment.

IMG_0451.hUYdnfwecyYF.jpg

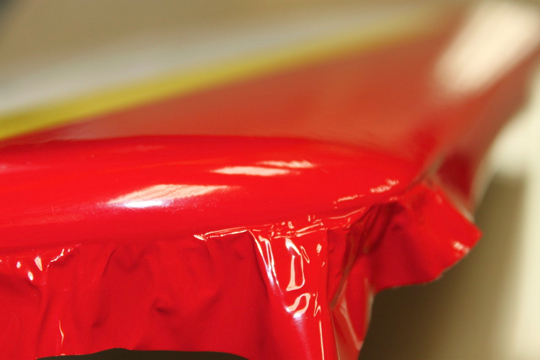
Now you have to pull the covering around the tip. I use my hot iron to help with this. A lot of patience, and allowing the covering to stretch makes the tip come out wrinkle free.

IMG_0453.smpmtS5HMROI.jpg

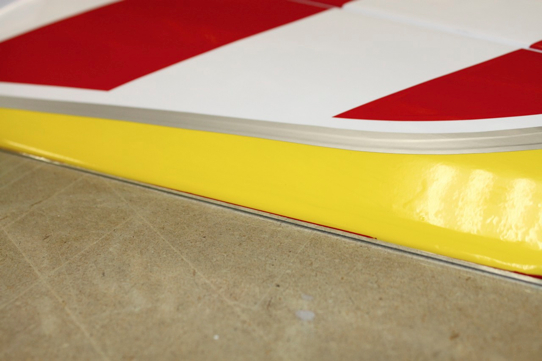
No trim the red and yellow along the masking tape, and peel the tape off. Be careful not to cut too deep into the bottom covering. You should be left with a nice straight line. I did this one freehand.

IMG_0454.vvEdnb92aYlJ.jpg

Next I trim the LE covering. Using the edge of the glass and a sharp blade you can get a nice straight cut where you want.

IMG_0455.aNEnIP2pvZBh.jpg

Finished LE

IMG_0456.qbVDJftL83KR.jpg

Now I do the blue, this piece is small and hard to keep still. So I cut an oversized piece and peel off the backing. I spray a little water onto my glass, lay down the covering and squeegee out with a card all the water. This sticks the covering down and allows you to make accurate cuts without it moving around.

IMG_0458.gVyVGIaNUY2H.jpg

Now iron the blue in place using some guides to keep it aligned.

IMG_0461.6oTxiZPJnkaR.jpg

Next cut the silver on the glass, and aligned and iron down much the same as the blue. The silver is the final piece so every side needs to be accurate as you will see all of them.

IMG_0462.6YvwefWZOzgm.jpg

Now it is time to cut the little sweeps out of our white template.

IMG_0463.mYmgv8JOL5sf.jpg

Using the techniques above, cut the sweeps on the glass and apply them to the stab.

IMG_0465.tgaWLCdvVmiJ.jpg

Now we have to split the covering down the hinge line. To do that I first fold the hinge line to give the covering a bit of a crease.

IMG_0467.3nh6q5ouvvFz.jpg

Then with a sharp blade, I split the covering down the hinge line. I keep the surface folded a bit to help guide the blade down the line.

IMG_0468.dkb4jcrMN0Hk.jpg

Now use the trim seal tool to seal down the leftover in the hinge line.

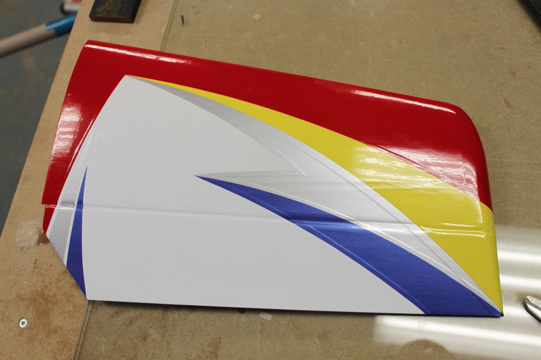
Voila, you now have a cool looking stab :)

IMG_0469.glLuQT42JtzO.jpg

This is a quick way to get a cool scheme. All told I can do two stabs like this in about 3 hours once I have the drawing made in AutoCAD. Usually doing the drawing takes as long as covering!

Chad

Sunday, December 26, 2010

The next generation

Our boy Matthew (4 years) got very lucky this Christmas and Santa brought him a SkyFly Max airplane. Maybe in a few years he will be beating up on the old man in FAI :)


IMG_0131.HP98IZCOtzYG.jpg

If the weather cooperates we should know how it flies in a couple of days!

My wife also got lucky, and Santa supplied her with a GPS so that she could take up the hobby of Geocaching. This is where you use a GPS to locate hidden “caches”. Its quite a popular activity around the world. Here are her and Matthew getting their first one together.


IMG_0186.PXWDZ2Ser3nQ.jpg


Chad

Sunday, December 19, 2010

2010 Coming to an end

Well the clock is ticking down on 2010. I hope that everyone had a great year for flying, I know that I sure did.

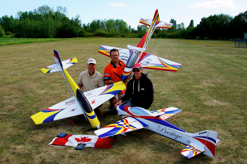
I started off the year getting my first giant scale model ready to fly. This was a PAU 30% Sukhoi SU-26. Instead of going the traditional DA-50 type powerplant, I decided to give a bigger electric model a try. This has been a fun model to fly at various events. Performance is outstanding, I think able to outperform a similar size gas setup. The only issue is the flight time, which is around 5-6 minutes depending on the style of flight.
IMG_0719.O9UYp95lSi0a.jpg


I did have one issue with the setup though. I was using the Schulze 40.160-xl controller for the model, and at near full power it would lose synchronization with the motor and shutdown. I was able to work around this by reducing the ATV (as I am running fixed ATV) thereby reducing the top end power a bit. As I had no lack of performance (around 5500W), this was not a concern.

I did however involve Schulze with this problem, as not everyone wants to fiddle around to make things work, this is one of the reasons for using high end equipment. A short video of the problem and the ability to data log the performance with the new controllers helped to explain the issue. A couple of revisions to the firmware were provided by Schulze, and voila, the problem was resolved. I can now run the motor to absolute full power and rapid application of throttle without an issue.

It was not long and F3A airplanes were brought out of winter hibernation. I continued to fly the same Xigris that I flew during the 2009 season. As this is a very good model there was no reason to make any significant changes to it. As I needed some new canalizers to replace the ones I lost in Portugal I spent some time to develop a little different size and shape than in the past. The new size worked perfectly for me all summer long. Maybe this particular size and shape will be available sometime in the future? :-)

IMG_3833.Zdp47dBCfMAx.jpg


Nedim and I drove down to Wenatchee, WA for the first contest of the year in May. Normally we would head out to Vancouver, but as their field had been closed that contest was put off for a year. Wenatchee turned out to be a fantastic field, and we had a great time at that event. I am not certain time will allow me to attend in 2011, but I definitely plan to go back in the future.

wenatchee2010024.2pISrXl0w29s.jpg


I spent the next 6 weeks preparing for what I considered the most important event of the season, the US National Championships. Well Nedim and I made the long trip (2 days!) to Muncie. We met up with many old friends and also made some new ones. No matter how the results turn out meeting the people is one of the best parts. As this was the team selection for the US team, everyone who was there was there to win. In a big surprise (at least to me), Quique chose to not continue (for now) in F3A. I missed seeing him this year, and hopefully at some point in the future he will decide to make a return.

Overall I think I had my strongest performance of any US Nats. In previous years I have been on the bubble and struggling to make the finals. This year I finished the preliminaries in 4th place, and the semi-finals in 5th place making it a fairly strong entry to the finals. However, in the end I finished 7th (for the third time). My first round of F was quite strong, but I was up first (which is never good) and the visibility was poor due to the haze. The first round of unknown I fell victim to my own stupidity and flew half of a 3/4 roll as a 3 of 4 point....DUH! It didn’t cost me a zero, but serious downgrades and threw the rest of the flight off a bit.

2010PatternNationals%28109%29.LTDb6UD1cLD4.jpg


After the Nats, we had two local contests one in Edmonton and our Canadian Nats. I won both of those events, even though I really didn’t fly after the US Nats because I was exhausted!

In that same time my wife and I bought a small RV to haul around to contests. With the kids starting to come along, this makes is much more tolerable to spend long hours at the field...as they have a place to sleep and a bathroom!

Victoria2010065.EnORyGkGZkH7.jpg


Shortly after we got the RV, we took a long trip out to Victoria BC for the Canadian team selection. We spent just under a week in Victoria and had a great time camping at the field with the local pilots, Dave, Mark and Hartley. I think the biggest news was that Mark Byrne came out and flew his butt off and beat out Dez Vaghy. I certainly was not expecting that and was happy that Mark was able to secure his first team spot. Dave Reaville who was on the team in 2007 also flew very well for the whole event, I think he missed making the team by only 6 points.

_IGP8036.JuEzeQbAAkJb.jpg


I had not flown much at all since the US Nats even at this point, and I think it showed. While I didn’t fly poor, I certainly was not up to pace with my best performances. At the end of the contest, I had won with Mark in second and Dez in third. This will be the team for the 2011 Worlds. This will be my 6th time to the Worlds, and I am going to be working hard to meet my goal of being in the finals.

My last event for the year was in Medellin Colombia! This was an absolutely fantastic event, and really exceeded all my expectations. It took me a few days to adjusted to flying again. Unfortunately we are not able to practice much in the month of October, so again I had to improve on the fly so to speak :) I think I started a little slow, but was able to put in some very solid rounds against the other pilots.

IMG_5157.3R9zwKOZQyr8.jpg


I was able to spend a lot of time with the local pilots from surrounding countries and hopefully helped them to better setup their airplanes and improve their own flying. There is a lot of talented pilots in South America, and its only a matter of time before they are pushing for the top positions in the Worlds. I really have to extend a huge thanks to all the pilots down there, especially Pablo Kuri and Eduardo for making that trip possible for me. Was one of the best times I have had at a contest. I made some new friends that hopefully I can see again in the future!

That was it for the flying, but things never end. Right now I am currently working on finishing up and test flying a Xigris C2. I have had this plane for a while, and should have flown it a long time ago, however with all the activity in life that did not happen. My goal is to get at least a couple of evaluation flights on this winter.

Also on the go is a Composite ARF Spark EDF jet. This is a plane I got used, but have done major work to in order to ensure that it is ready for serious speed. In a past life I did a bit of pylon racing, so some speed is still in the blood. It is equipped with a Schubeler DS-75 fan, Plettenberg Dinator 70/2, and 12S 5000 45C Thunder Power batteries. This setup is not just any DS-75, but a reinforced DS-75 so that it will be able to handle the 6000W that I plan to send to it :) I am hoping to be able to hit around 350-370 kph with it, which should make it one of, if not the fastest EDF in this part of Canada.

Oh and there is a bunch of indoor F3P stuff as well, but I will save that for the new year!

Behind any successful season are a lot of people that I need to thank, without their help I couldn’t do this

Agnes, Matthew and Thomas (wife and kids) for not killing me
Nedim Bek - for his non-stop dedication to coaching me
Jean-Pierre Zardini @ ZN Line
Frank Noll @ Futaba/Hobbico
Diana and Uwe Plettenberg - Plettenberg
Matthias Schulze and Ulf Herder - Schulze
Jason Merkle @ Thunder Power RC
Bob Obenberger @ Tru-Turn Spinners
Bartek @ Revoc Custom bags
Mark & Robyn Byrne @ CRC Products
Jack Price @ Duralite
Jon Harwood @ HCC Custom Composites

See you all in 2011!
Chad